A Closer Look at Azure AD Connect – Part 1
Microsoft released Azure AD Connect to the public on June 24. The long-anticipated tool is the...


Welcome to the fifth part of this article series about Azure AD Connect. In the previous article, we've taken a look at some of the optional features you can enable for directory synchronization. In this article, we'll cover a few more features -- more specifically the User and Group write-back capabilities.
Before discussing these features, note that they are currently in preview. You can test the features, but should not use them in production unless you have explicit permission by Microsoft.
Now that the disclaimer is out of the way, let's have a look at the User write-back feature.
As the name implies, the user write-back feature will synchronize user accounts from Azure Active Directory back into the on-premises environment. In this version of the feature, only accounts that have been created in Azure AD/Office 365 are synchronized back into the on-premises Active Directory. Changes made to accounts originally synchronized from the on-premises directory are not synchronized back. It's not clear if Microsoft will offer this capability in the future, but I would not be too surprised about it.
Today, if you synchronize an on-premises account to Azure AD, most attributes are 'locked,' which means that you cannot modify them in Azure AD or Office 365. This is to avoid issues of having an object with different attribute values on-premises and in Microsoft's online services. However, if partial write-back were available, you could in theory allow an account to be managed from either Azure AD or the on-premises environment. As such, I can imagine how Microsoft could lift the requirement to keep an on-premises Exchange server around if you want to manage Exchange Online recipients. But, alas, for now that isn't the case.
Once you enable the feature from the Optional Features page, you will have to run through an additional step in the wizard. In this step, you will have to select the destination (Organizational Unit) in which these accounts will be written back:
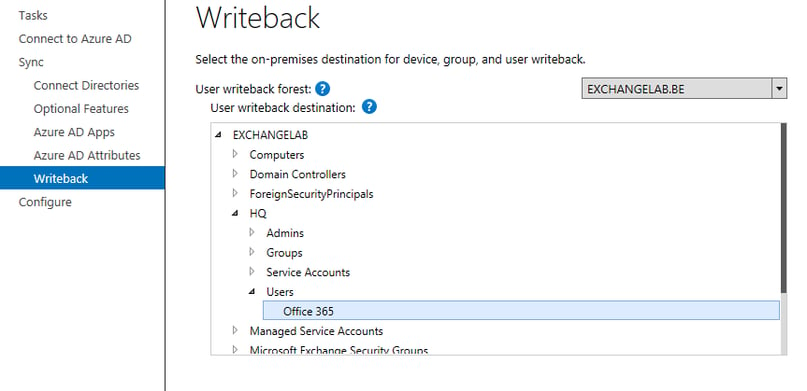
Image: selecting the destination OU for accounts that are synchronized back
Oddly enough, you cannot create a new OU from within the wizard. So if you want to use a separate OU, make sure to create it before running the wizard.
In order for Azure AD Sync to be able to write-back attributes in the on-premises environment, you need to give the service account the appropriate permissions to write back into the on-premises Active Directory. Unlike for hybrid attribute write-back or password write-back, you do not need to use dsacls.exe to grant permissions to the service account. Instead, Azure AD Connect comes with a PowerShell module that allows you to do just that. The module isn't automatically available when you install Azure AD Connect; you must manually import the module, which is located in the ADPrep folder in the Azure AD Connect installation folder:
Import-Module "C:\Program Files\Microsoft Azure Active Directory Connect\AdPrep\AdSyncPrep.psm1"
Next, you must use the Initialize-ADSyncUserWrite-back cmdlet to set up the permissions. Underlying, the cmdlet uses the dsacls.exe command-line utility, which means the utility has to be present on the system. By default, this would not be the case, and you would run into the following error message:

Image: error message thrown by the Initialize-ADSyncUserWrite-back command if dsacls.exe is not present on the system.
Note: To install dsacls.exe on the Azure AD Connect server, you could, for example, install the AD Remote Administration tools by running the Install-WindowsFeature RSAT-ADDS PowerShell command.
Once you have taken care of that, you can run the cmdlet again and see something similar to this:

Image: running the Initialize-ADSyncUserWrite-back command
Once synchronization has completed, you will notice that the accounts are now in the OU that you specified before:
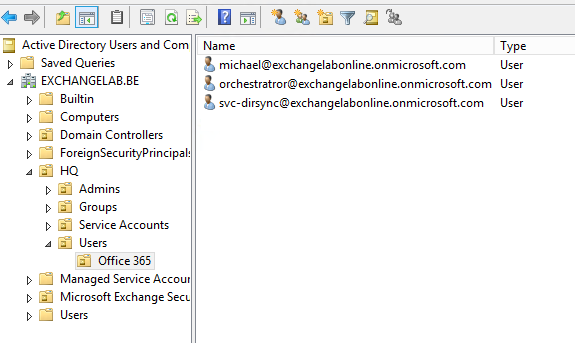
Image: synchronized accounts in the on-premises Active Directory
Subsequent synchronizations will automatically update the user account; any change you make in Azure AD is synchronized to this account in the on-premises Active Directory. It is important to understand that changes you make to these accounts in the on-premises Active Directory are not synchronized to Azure AD. Even more, they do not persist as changes that are automatically overwritten when the next synchronization happens.
Without the two-way sync, the feature might seem relatively useless. I agree to a certain extent that the two-way sync is what we are really waiting for. However, this opens up the ability to populate an on-premises Active Directory based on an existing Azure AD tenant – something that’s bound to happen more and more. Another use case is to have the objects that are created in Azure AD/Office 365 available in the on-premises Active Directory.
Unfortunately, the write-back feature does not synchronize back the Exchange attributes. This means that, even though the user accounts could have a mailbox in Office 365, they would not show up in the on-premises GAL. However, you can make them show up manually by running the Enable-RemoteMailbox cmdlet, for example. Doing so will enable the required on-premises attributes. However, because there is no two-way sync, these attributes will not be synchronized to Azure AD. Unlike the 'regular' user attributes, the Exchange attributes aren't overwritten on subsequent synchronizations.
Similar to the user write-back feature, the group write-back feature does exactly as it says: it writes Office 365 Groups from Azure AD into the on-premises Active Directory. The way it works is very similar, and it has pretty much the same limitations and caveats.
To set up the feature, you must also configure the required permissions. For this, too, Azure AD Connect has a built-in cmdlet that becomes available as soon as you import the module from the AdPrep folder: Initialize-ADSyncGroupWrite-back
Image: running the Initialize-ADSyncGroupWrite-back command
After the synchronization completes, Office 365 Groups will show up in the on-premises container, which you selected during the configuration:
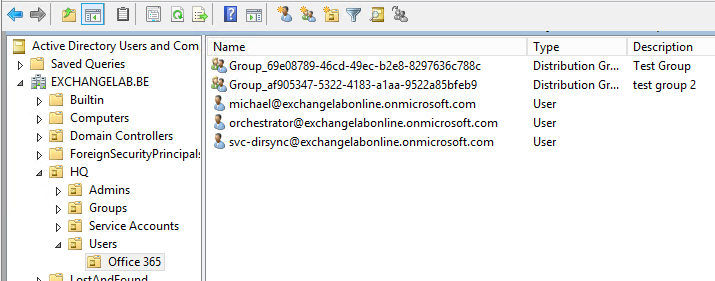
Image: synchronized groups in the on-premises Active Directory
Just like user accounts, the synchronized groups will not show up in the on-premises Global Address list; you need to run the Update-Recipient cmdlet first as illustrated in the following example:
Update-Recipient Group_af905347-5322-4183-a1aa-9522a85bfeb9
Once you have done that, the group will show up in the Global Address List:
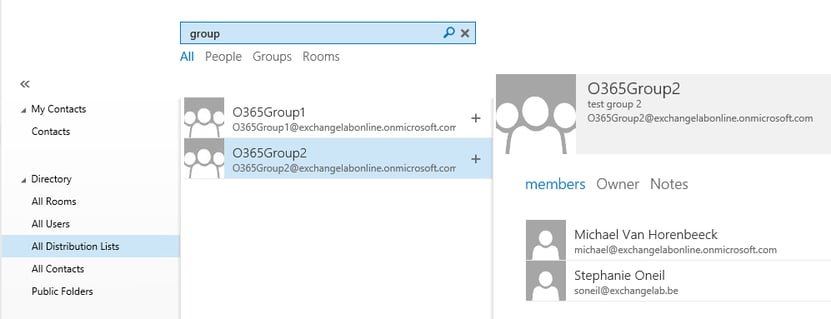
Image: a synchronized group in the Global Address List (OWA)
As you can see from the screenshot, the synchronized group also includes the members. If you have user write-back enabled, the group memberships for online-created user accounts are also included. However, if you do not have user write-back enabled, only group membership for on-premises accounts are included.
This concludes part 5 of this series. In part 6, we will take a quick look at the Directory extension attribute sync and look into the first troubleshooting steps.
Other articles in this series:

Michael Van Horenbeeck is a Microsoft Certified Solutions Master (MCSM) and Exchange Server MVP from Belgium, with a strong focus on Microsoft Exchange, Office 365, Active Directory, and a bit of Lync. Michael has been active in the industry for about 12 years and developed a love for Exchange back in 2000. He is a frequent blogger and a member of the Belgian Unified Communications User Group Pro-Exchange. Besides writing about technology, Michael is a regular contributor to The UC Architects podcast and speaker at various conferences around the world.

Microsoft released Azure AD Connect to the public on June 24. The long-anticipated tool is the...