A Closer Look at Azure AD Connect – Part 3
Welcome to the third part of this article series about Azure AD Connect. In the previous article, I...


Welcome to the fourth part of this article series about Azure AD Connect. In the previous article, I discussed permissions for a custom installation, and we dived a little deeper into the upgrade capabilities. Before jumping into the 'advanced' customization options such the filtering abilities, I wanted to take a look at some of the additional (preview) features that Azure AD Connect offers to date.
In this article, we'll focus on Azure AD App & attribute filtering as well as the password write-back feature. In part five, we'll explore the various preview features. The support for hybrid deployments and password sync have already been covered in previous articles.
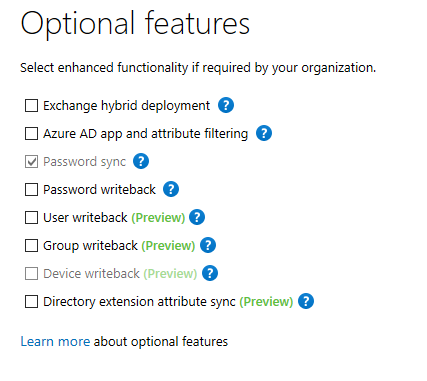
You can enable additional features in the Azure AD Connect configuration wizard. If you haven't enabled them when installing the tool, you can always re-run the wizard later to enable/disable certain features.

Image 1: List of Azure AD Connect (optional) features
The default configuration of Azure AD Connect will synchronize almost all object and object attributes from your Active Directory to Azure AD. This means it might also synchronize object attributes that you do not necessarily need in Office 365. While this isn't necessarily a problem, I imagine that some customers might want to limit what attributes are synchronized to Office 365. High-security environments can be especially 'paranoid' about what gets synchronized to Azure AD.
If the feature is selected, two additional steps are added to the wizard:
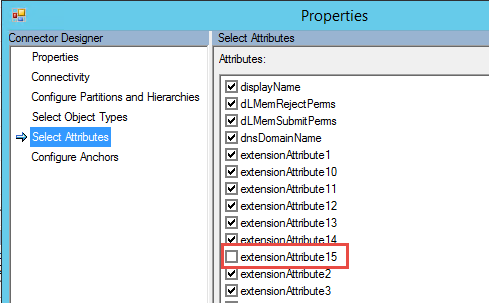
For instance, if you remove the ExtentionAttribute15 from the list, it is automatically unselected in the list, too. If you use the Synchronization Service Manager, you can view the properties of the Connector by right-clicking it and selecting properties. Afterward, click Select Attributes:

Image 2: filtered attribute
The password write-back feature is a very interesting one. It's the perfect way to enable users to change their own password using Azure’s Self-Service Password Reset capabilities AND ensure that the password change is synchronized back into the on-premises Active Directory. This feature can be used in conjunction with Password Hash Synchronization or Active Directory Federation Services.
In the former scenario, it prevents the situation where a password is changed in Office 365 but not in the on-premises environment and, as such, creates an inconsistency between both environments. After password hash synchronization is enabled and the initial "seeding" of the passwords has been completed, only on-premises password changes are synced back to Azure AD. If a user would then be able to change his password in Office 365 (without password write-back enabled), the password would only be changed in Office 365 and thus be out of sync with the on-prem password. If the user then changes his password on-premises, the password in Office 365 is overwritten by the on-prem password, which potentially creates very confusing situations.
The password write-back feature is part of the Azure AD Premium license. You must first ensure that you have enabled premium licenses for your tenant and your users. A trial provides you with 100 licenses, more than enough to test the feature! Enabling the trial is done through the Azure AD portal. You can get to the portal from within the Office 365 Portal and clicking Azure AD under services.
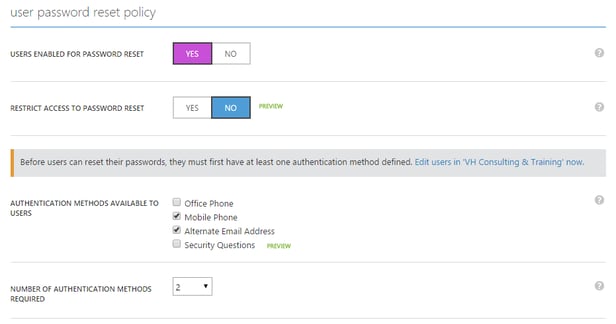
Once you have enabled the trial (or purchased licenses), go to Configure and navigate to the User Password Reset policy section in the Azure AD Portal. If not yet enabled, now would be a good time to enable the Password Reset capability. Note that you may need to assign the Azure AD Premium licenses before this section becomes visible.

Image 3: activating the password reset capability.
The password reset functionality allows users to proactively change their password or reset passwords when they forget it.
Before you can use the password write-back feature, you must also enable it on the directory synchronization server. After running through the wizard, verify that Password write-back has been successfully enabled on the synchronization server by running the following PowerShell command:
[PS] C:\> Import-Module ADSync
[PS] C:\> Get-ADSyncAADPasswordResetConfiguration -Connector (Get-ADSyncConnector | ? Subtype -eq "Windows Azure Active Directory (Microsoft)").name
After this, ensure that the Azure AD Connect service account has the necessary permissions to reset/change passwords. You can do this using the Active Directory management tools, but it's easier to run the following PowerShell cmdlet from a server, which has the cmd-line utility dsacls.exe installed:
#Enable Password Hash Synchronization
#Service Account Name
$accountName = "Exchangelab\svc-AADC2"
#Organization Unit or Domain Tree DN
$scope = "DC=Exchangelab,DC=BE"
#Configure Password Write-Back
Write-Host "-------------------------------------------" -ForegroundColor Yellow
Write-Host "Configuring Password write-back Permissions" -ForegroundColor Yellow
Write-Host "-------------------------------------------" -ForegroundColor Yellow
Invoke-Expression "dsacls.exe '$scope' /I:S /G `"`"$accountName`":CA;Reset Password;User`" `"`"$accountName`":CA;Change Password;User`" `"`"$accountName`":WP;LockoutTime;User`" `"`"$accountName`":WP;pwdLastSet;User`""
The scope ($scope) determines whose user passwords can be reset. Technically, it controls to what container (or Organizational Unit) the permissions are applied. From there, permissions are applied to underlying objects, such as user objects. If you have a specific OU which contains the users that are synchronized with Azure AD, feel free to specify that instead. Just make sure to specify it in the Distinguished Name format!
Note: After running the script, it's worth double-checking the permissions in Active Directory. The permissions are propagated down from the object on which they have been applied. If you set the scope to the domain root, but have blocked inheritance on some OUs, the objects under that OU will not have the proper permissions.
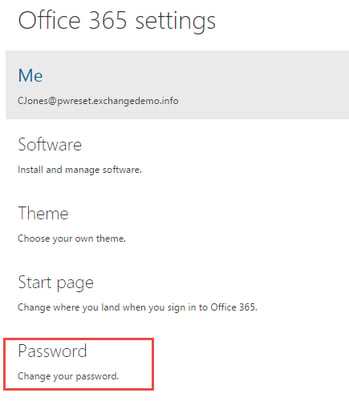
To reset your password in Office 365, log in to the portal and navigate to the Office 365 settings. From there, select Change your password as illustrated in the image below:

The user is now taken to a page where he can reset his password. Once the user clicks on Submit, several things happen:
As mentioned before, the lack of the correct permissions might cause a password reset to fail. It is important to understand that the on-premises password reset policy controls what passwords you can use and how often you can change it. Even though password synchronization or write-back is set up, Office 365 is not aware of the on-premises password policy. If users try to reset a password that strokes with the on-premises policy, they might get a simple error message, which does not always reveal why the password cannot be reset. Properly informing your users on what they can expect is important, too!
That's it for this part of the article series. As stated earlier, we will take a look at the preview features in part five.
Have fun!
Other articles in this series:

Michael Van Horenbeeck is a Microsoft Certified Solutions Master (MCSM) and Exchange Server MVP from Belgium, with a strong focus on Microsoft Exchange, Office 365, Active Directory, and a bit of Lync. Michael has been active in the industry for about 12 years and developed a love for Exchange back in 2000. He is a frequent blogger and a member of the Belgian Unified Communications User Group Pro-Exchange. Besides writing about technology, Michael is a regular contributor to The UC Architects podcast and speaker at various conferences around the world.
