A Closer Look at Azure AD Connect – Part 4
Welcome to the fourth part of this article series about Azure AD Connect. In the previous article,...


Welcome to the third part of this article series about Azure AD Connect. In the previous article, I discussed the various custom installation options and the implications of using a separate SQL database.
Following that article, I received a few interesting questions that warranted some follow-up. More specifically, I had a few people call out that documentation regarding the required permissions for Azure AD Connect is scarce.
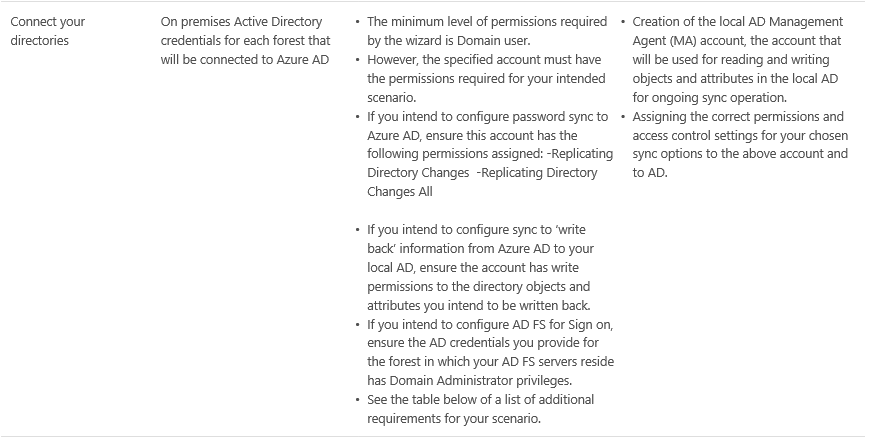
Although the requirements are documented as depicted in the image below, I agree that there might be some confusion, depending on your deployment configuration.

Image 1: Azure AD Connect account requirements in a custom setup (courtesy: Microsoft)
If you are doing a simple installation of the tool (as described in the first part of this article series), the Azure AD Connect installation will take care of configuring the required permissions for the synchronization account. The wizard leverages the Enterprise Admin credentials you provide and creates a service account. It then gives this account appropriate permissions throughout the forest to ensure that directory synchronization can operate successfully. The permissions are configured once on the root domain and propagated down from there.
Things get a little more interesting when you select a custom deployment (as described in the second article). In a custom configuration, Azure AD Connect will not configure any permissions. Instead, you must create and provide a service account yourself (see Image 1). One way to go about this is to use Active Directory Users & Computers to configure the permissions on the forest root domain object. Another easier way is to script the configuration of the permissions. The following PowerShell script uses the command-line tool DSACLS.exe to configure the required write-back permissions in a hybrid deployment:
#This script configures permissions documented on:
#https://msdn.microsoft.com/en-us/library/azure/dn757602.aspx
#Get Domain Root
$DomainRoot = ([ADSI]"LDAP://RootDSE").rootDomainNamingContext
#Service Account Name
$accountName = "Exchangelab\svc-AADC2"
#Enable Hybrid Configuration Write-Back
#Configure Contact Write-Back
Write-Host "--------------------------------------" -ForegroundColor Yellow
Write-Host "Configure Contact Object Permissions" -ForegroundColor Yellow
Write-Host "--------------------------------------" -ForegroundColor Yellow
Invoke-Expression "dsacls.exe '$DomainRoot' /I:S /G `"`"$accountName`":WP;proxyAddresses;Contact`""
#Configure Group Write-Back
Write-Host "--------------------------------------" -ForegroundColor Yellow
Write-Host "Configuring Group Object Permissions" -ForegroundColor Yellow
Write-Host "--------------------------------------" -ForegroundColor Yellow
Invoke-Expression "dsacls.exe '$DomainRoot' /I:S /G `"`"$accountName`":WP;proxyAddresses;Group`""
#Configure User Write-Back
Write-Host "--------------------------------------" -ForegroundColor Yellow
Write-Host "Configuring User Object Permissions" -ForegroundColor Yellow
Write-Host "--------------------------------------" -ForegroundColor Yellow
Invoke-Expression "dsacls.exe '$DomainRoot' /I:S /G `"`"$accountName`":WP;proxyAddresses;User`" `"`"$accountName`":WP;msExchArchiveStatus`" `"`"$accountName`":WP;msExchBlockedSendersHash`" `"`"$accountName`":WP;msExchSafeRecipientsHash`" `"`"$accountName`":WP;msExchSafeSendersHash`" `"`"$accountName`":WP;msExchUCVoiceMailSettings`" `"`"$accountName`":WP;msExchUserHoldPolicies`""
The same approach is also valid to configure permissions for Password Hash Synchronization:
#Enable Password Hash Synchronization
Write-Host "--------------------------------------" -ForegroundColor Yellow
Write-Host "Enabling Password Hash Synchronization" -ForegroundColor Yellow
Write-Host "--------------------------------------" -ForegroundColor Yellow
Invoke-Expression "dsacls.exe `"$DomainRoot`" /G `"`"$accountName`":CA;Replicating Directory Changes`" `"`"$accountName`":CA;Replicating Directory Changes All`""
Upgrading to Azure AD Connect
Now that we've cleared up the particularities with the required permissions, let's take a look at what the upgrade experience is like when you already have a previous version of the directory synchronization tool installed. In this article, we'll focus on the upgrade experience coming from Azure AD Sync Services (which is also what Azure AD Connect uses under the hood).
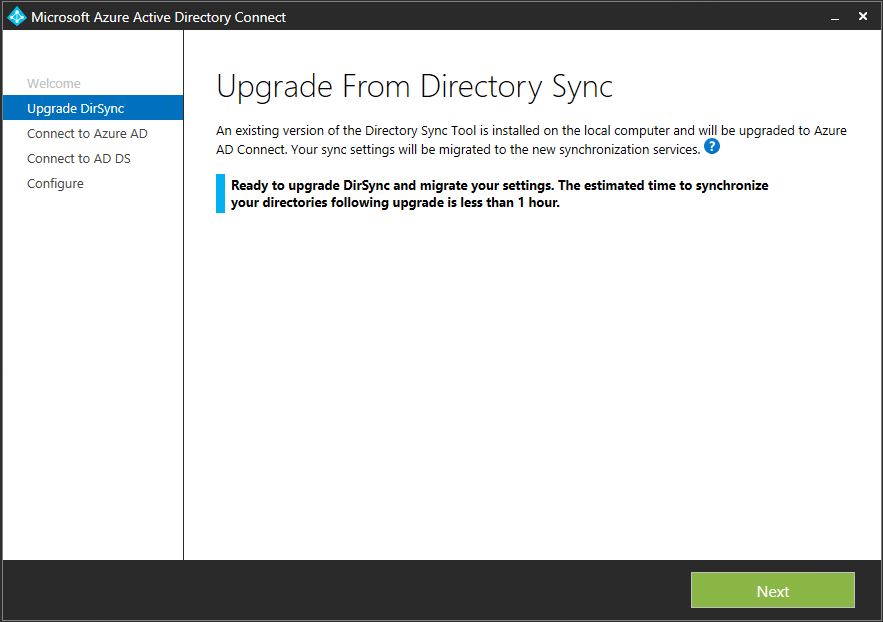
In-place upgradeOne of the cool features of Azure AD Connect is that it will allow you to do an in-place upgrade. This means you will be running the setup wizard on the server that is running the directory synchronization tool today. The wizard first analyzes the existing AADSync installation, after which it offers to upgrade, as illustrated in the image below:

After clicking Next, you will have to specify both the Azure AD and on-premises accounts that were used in AADSync. These accounts cannot be changed at this time, which means you will have to provide credentials for whatever accounts were configured in DirSync. Once the upgrade is complete, you can modify the existing configuration and (potentially) change the accounts that are used. But that's a different discussion.
While DirSync is being upgraded, synchronization to Azure AD is suspended. During my testing, most upgrades took about 10 minutes to complete. That’s probably because I tested with relatively simple scenarios (and due to the limited number of objects in the metaverse).
After the upgrade process, you will notice that the AAD Connect icon becomes available on the desktop. Just like a regular install, you can use it to modify your configuration and enable/disable other features.
Note that an upgrade to Azure AD Connect is only available if your current synchronization server is syncing less than 50,000 objects. If you have more objects, a migration is the only option.
Migrating to Azure AD ConnectInstead of performing an in-place upgrade, you can also migrate to AAD Connect. A migration is similar to an upgrade; the big difference is that you’re setting up a separate AAD Connect server. It is also called a side-by-side installation (or swing migration, if you will). This approach is recommended if you are running a complex DirSync configuration or you have FIM with the Office 365 connector installed.
Before switching to Azure AD Connect, you can use the csexport cmd-line tool to export the objects, which will be synchronized with Azure AD or your on-premises organization. This is particularly useful to verify that no objects are going to be synchronized that should not be. The procedure for running csexport is explained here.
Usually, the tool is located in C:\Program Files\Microsoft Azure AD Sync\Bin:
C:\Program Files\Microsoft Azure AD Sync\Bin> csexport <onpremconnector> c:\export.xml /f:x
Microsoft Identity Integration Server Connector Space Export Utility v1.0.485.222
c 2014 Microsoft Corporation. All rights reserved
[619/619]
Successfully exported connector space to file 'c:\ad.xml'.
C:\Program Files\Microsoft Azure AD Sync\Bin>You can try reading through the XML file yourself or use another cmd-line tool, CSExportAnalyzer, to create a CSV file, which is a little more readable.
Once you are sure that the new AAD Connect is ready to take on its responsibility, go into the 'old' DirSync server and disable/uninstall the synchronization tool. Personally, I like the latter option because that way you are sure it cannot accidentally be brought online. After that, all you need to do is disable staging mode and start the synchronization.
That's it for this part. In part 4, we will take a look at some of the customization options such as attribute filtering, etc.
Have fun!
Other articles from this series:

Michael Van Horenbeeck is a Microsoft Certified Solutions Master (MCSM) and Exchange Server MVP from Belgium, with a strong focus on Microsoft Exchange, Office 365, Active Directory, and a bit of Lync. Michael has been active in the industry for about 12 years and developed a love for Exchange back in 2000. He is a frequent blogger and a member of the Belgian Unified Communications User Group Pro-Exchange. Besides writing about technology, Michael is a regular contributor to The UC Architects podcast and speaker at various conferences around the world.
