With the increasing number of services and features in Office 365, keeping up with all the changes can be a challenge. Keeping an eye on all the different ways a user can do harm, either willingly or by mistake, is not an easy task, either. While the on-premises versions of Exchange and SharePoint do offer some form of auditing, many organizations were surprised to find out that things were quite different after their move to the cloud.
There was barely any auditing in the beginning, even for tasks performed by administrators, and in other areas it was very limited. (For example, until recently, auditing owner actions was not possible in Exchange Online). It took several years for Microsoft to address those issues, but now we have a role-based, searchable, exportable, unified log across (almost) all Office 365 workloads and operations, as well as the corresponding APIs. In case you are not familiar with the unified audit log, the article "Search the audit log in the compliance center" is a good starting point.
In the current article, we will introduce you to another recent improvement in the area, namely the Activity alerts in the Security and Compliance Center. Instead of searching the audit logs for a particular event, or user, you can simply configure an alert and have the system notify you automatically upon detecting a matching event. Let’s take a more detailed look.
Note: This functionality is still actively under development and the experience might not match what’s described in this article. In addition, some glitches will most likely be noticeable. Still, in my opinion, the feature is an important one and even being aware of its existence should add some value.
Configuring activity alerts via the UI
Before I forget, a word about the prerequisites. Make sure that your audit logs are enabled, as obviously no alerts can be generated if no events are collected by the system. The process might take 24h or more, so be patient. You will also need the relevant permissions to access the logs and configure alerts, but for the sake of simplicity let’s assume you will be using a Global Admin account. Here are more details about the different prerequisites and Create activity alerts.
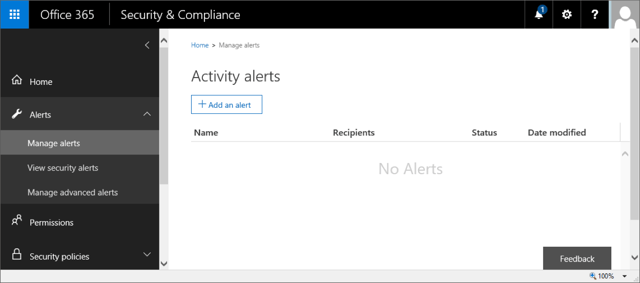
To access the relevant UI controls, login to the Office 365 portal, navigate to the Security and Compliance Center, then expand the Alerts node on the left. The section we are interested in is called Manage Alerts. Alternatively, you can access it directly via: https://protection.office.com/#/managealerts.
The page doesn’t really offer much, just a list of currently configured alerts and a button to configure a new one. It should look something like this:

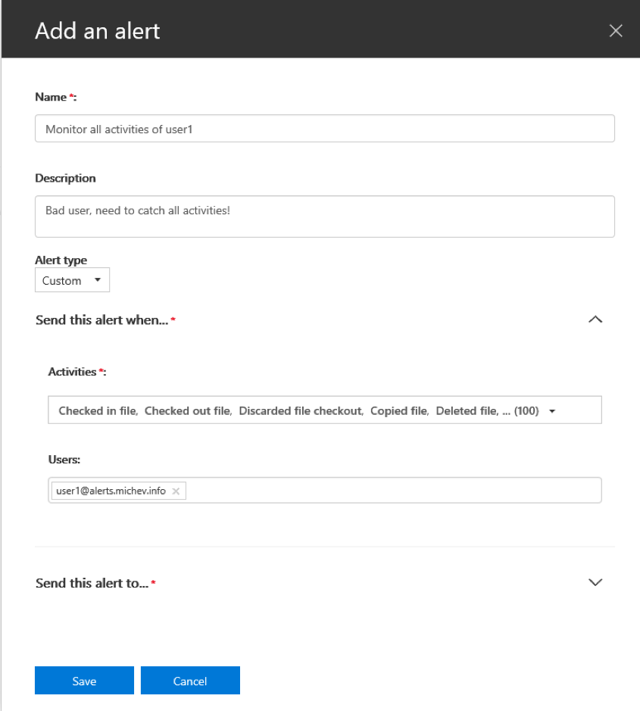
To create an alert, simply press the Add an alert button. A new pane will be expanded on the right, with fields to enter a Name for the alert, short Description and the Alert type (which can be either Elevation of privileges, or Custom, covering one or more of the individual audited operations).
In the example below, we are auditing all activities of a particular user, with the exception of any Sway related activities. As you can see from the screenshot, the total number of operations that can be captured is quite big – in total 100 event types have been selected. The remaining ones, related to Sway, add another 14 to this number. The list matches the types of events we can search for in the Audit logs section of the SCC, and as new events become available, it will be expanded.

Once you have specified the type of Activities to monitor and the Users, you must also specify Recipient(s) for the email notifications. The UI only allows you to select internal recipients, so if you want a copy to be sent to external ones as well, you will have to use PowerShell. More about this in the next sections.
If you are editing an existing alert, you will also be presented with a Delete alert button, as well as an On/Off toggle. One of the glitches I warned you about will be noticeable while Editing an alert – while you can make changes to the recipient list, adjusting the types of monitored activities doesn’t seem to be currently working. Another noticeable glitch is that we cannot create an alert of the “Elevation of privilege” type for now. If you try to do so, you will be greeted by an error message. Again, this is an early preview of the feature, so glitches can be expected.
You can also create alerts directly from the Audit logs search page, where a new button Add an alert should be visible. The experience will match what we already described above.
What the alerts look like
Here’s an example alert I received as a result of the rule we configured in the previous section. In this case, the user being monitored (user1@alerts.michev.info) had modified a file inside his personal OneDrive for business library as visible from the below email:
Additional details in the notification include the time of activity and the IP address from which the user was logged. Quick links for performing a detailed search based on the user, operation or item (the ODFB site in this case) are also included. They allow you to easily review any additional entries in the Audit logs, and are conveniently scoped for a timeframe covering the last 24 hours before the email generation. The name of the alert is visible in several places, so you can quickly locate it if changes are needed (perhaps if too many alerts are being generated).
The sender address, o365alt2@microsoft.com does look a bit strange, but that will probably change as the feature matures.
Using PowerShell to work with Activity alerts
A set of PowerShell cmdlets will be provided to manage Activity alerts. As usual, some properties will only be exposed via PowerShell, and it will be the preferred method for performing bulk actions, exporting data and automating solutions. To use the cmdlets, you will need to create a session to the SCC as detailed in the article "Exchange Online PowerShell". At this time, there are four cmdlets available:
We can use the cmdlets to view, create, remove and edit alerts respectively. The “C” prefix in the above output was added when creating the remote session, as per my preference. In your case, the prefix might be different or absent altogether (for example, to create a new alert you could simply use New-ActivityAlert).
As expected, we can use the Get-ActivityAlert cmdlet to display info about any configured alerts. In the case of the alert we created in the first section, we will see the following output (only a few interesting properties are selected):
Changing settings can be done via the Set-ActivityAlert cmdlet. For example, the cmdlet can be used to configure an external recipient for the alert notifications. As mentioned above, this is not possible via the UI, even if the external address is present as contact in your Office 365 tenant. To add another recipient, one could use:
Be careful when using the New/Set-ActivityAlert cmdlets, though, because there’s practically no error handling currently implemented. You can enter anything for the user id to be monitored, the types of operations or the email address of the recipient. Speaking of operations, we already mentioned that the number is quite large, totaling 114 at present. There is no easy way to include multiple operations via PowerShell currently, as wildcards are not supported. You will have to list each one individually, and to do so, you actually need to know their names. While most of the operations names are listed in the Audit log documentation, others are not and the only way to get the operation name is to create a new alert with all operations ticked via the UI, then examine its properties via PowerShell. This cmdlet can help you output all the operation names:
(Get-CActivityAlert All).operation
If you happen to make a mistake, PowerShell will happily continue working, while the UI will start complaining. In this example, I created a new alert via PowerShell and tried to use “files*” as a value for the Operation parameter, hoping to include all file-related operations. The result was simply adding an operation named “files*”, which of course does not exist:
Another point worth mentioning here is that most of the settings cannot be changed after an alert has been created. This applies to both the UI and PowerShell, although you will get no visible indicator of the failure to update settings when using the UI. In PowerShell, you will be greeted with a warning:
The workaround is to create a new rule and remove the old one, at least for the time being. The latter is not an immediate operation, it will take some time for the alert to be deleted, and in the meantime, its status will be PendingDeletion.
Summary
This concludes our short overview of the latest addition in the Office 365 compliance toolset – the Activity alerts that allow us to easily monitor a large set of operations performed by users or admins. While the feature is still reactive in nature, using it will be far more convenient compared to manually searching the Audit logs, which can easily contain millions of events in large organizations. This functionality is still in its infancy, and it’s probably few months away from being officially released, so don’t expect the best experience (or even for it to be available in your tenant). Even so, I consider it as one of the most important additions to the service in the last few months, and I will continue monitoring the progress the team is making.