Auditing Your Azure RMS Protected Documents
Azure Rights Management Service (RMS) is an information protection solution, the cloud-based...

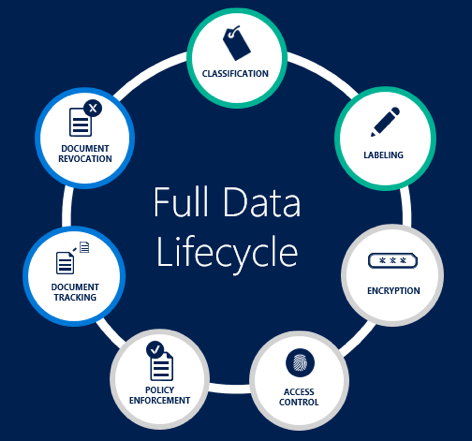
Ignite ended about a month ago, and it’s time to start exploring some of the new features and services that were introduced in Atlanta. In this article, we will take a look at Azure Information Protection, the next chapter in Microsoft’s data protection story.
Azure Information Protection (AIP) was first announced back in June, and a preview followed the next month. On October 4, the service reached general availability status. AIP provides an easier, user-oriented means to label and classify your documents, made available by the recent acquisition of Secure Islands. Similarly to the protection offered by RMS, classification travels with your document. Combined with the protection and monitoring capabilities we already have as part of Azure RMS, AIP provides a comprehensive solution that spans over the full lifecycle of your sensitive documents.
To get access to the Azure Information Protection service, you need to have a qualifying subscription. Those include:
To make some sense of this licensing mess and select the SKU that best matches your needs, you can refer to the comparison table between the EM+S SKUs here and the feature comparison between the two AIP SKUs here.
Or, you can simply trial the EM+S E5 SKU via the Office 365 portal or directly via this link. Note that you will also need an Azure subscription, as the AIP policies are only configurable via the Azure RM portal.
Once you have a qualifying SKU, you will need to enable the AIP management blade in your Azure RM portal. To do so, navigate to https://portal.azure.com/ and log in with your Global Admin credentials. Press the New button then type in Azure Information Protection in the search box. In the Results pane, select Azure Information Protection and then press the Create button on the AIP blade. Yet another blade will pop up on the right. Press the Create button again and select the Pin to dashboard checkbox.
Now you should be able to access the actual Azure Information Protection blade. This is the place where you can make changes to the default AIP policy, such as create or edit Classification Labels, their corresponding actions or the overall settings. A default policy is provided so that you can start using AIP right out of the box.
You will also need to configure your users’ devices to support AIP. The classification of documents is made available by the Azure Information Protection application, which in its current form is an Office add-in. The add-in connects to the AIP service and fetches the classification labels configured for your organization, providing the user with the option to view or set the document sensitivity via the Information Protection bar: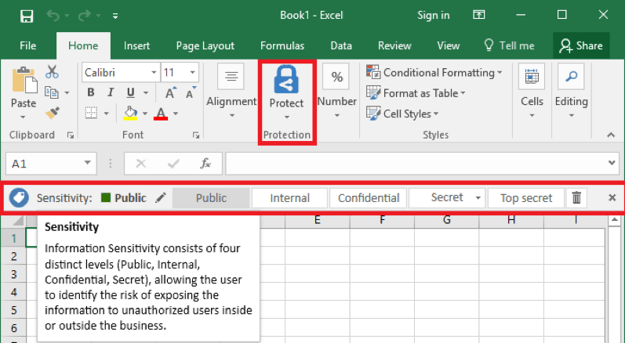
If you are interested in not only classifying, but also protecting your content via Azure RMS, you’ll need to enable the RMS service for your tenant and configure clients accordingly. This is beyond the scope of the current article.
Now that we have a reference on how the AIP classification settings look like in the client, we can continue with administering the policy. This is done via the corresponding blade in the Azure RM portal, showcased below, with some modifications made to the default settings to better illustrate the different elements of the policy: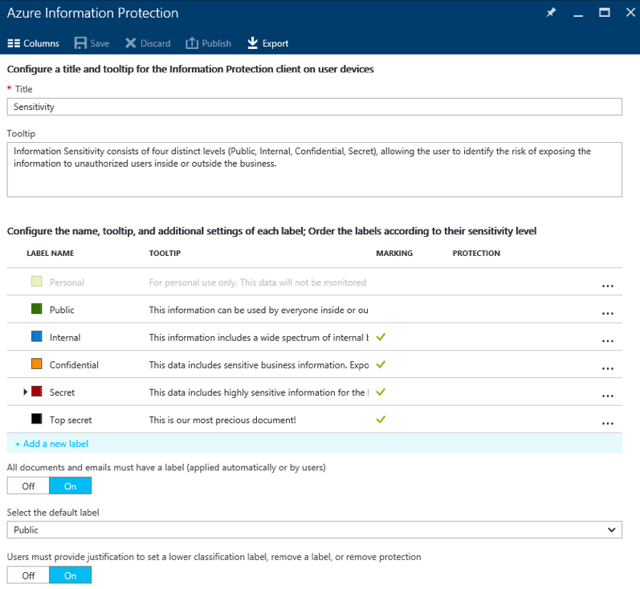
The central piece are of course the classification labels. A default set of 5 labels is provided in the policy, and correspondingly, the AIP client has just enough room to place 5 of them on the Information Protection bar. Each label features a Name, Tooltip/Description, and indicators for Visual Markings and Protection status, plus a Color assigned to it. In addition, you can toggle indicators for Conditions and the Enabled status by pressing the Columns button on top. You can reorder the labels or create sublevels, which are then displayed as dropdown in the client (with only a single sublevel supported). We will cover creating/editing labels in the next section.
The policy Title defines the text displayed on the left side of the Information Protection bar in the application, so using something meaningful such as the default “Sensitivity” value is recommended. Tooltip defines the text displayed when hovering over the Title as shown on the screenshot in the previous section. Again, make sure to enter meaningful and descriptive text here.
The "This document must have a label" toggle (applied automatically or by users) allows you to enforce mandatory classification if required, as shown on the screenshot below. You can also configure a default label via the Select the default label dropdown. Lastly, you can require users to provide an explanation when switching to a less restrictive label (for example trying to set a Public label to a document that has been classified as Internal). This is controlled via the "Users must provide justification to set a lower classification label, remove a label, or remove protection" toggle.
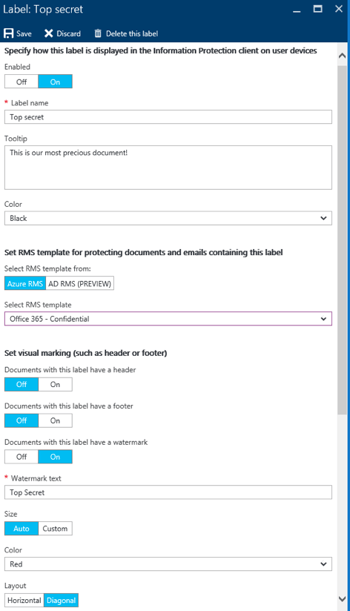 In case the default set of classification labels are not suitable for your needs, you can Add a new label by clicking the corresponding link. Then, specify whether the new label is Enabled, and provide it with a meaningful Label name and Tooltip. The latter will be shown when you hover over the label in the AIP client, as will the Color.
The next set of options you can configure are related to protecting the content with RMS encryption. You can choose to Select RMS template from either Azure RMS or from on-prem AD RMS instance. You will also need to Select RMS template from the list of available ones or choose to Remove protection for any files classified with this label.
Apart from protecting the document with RMS, you can also select to insert some visual markings. Those include a header, a footer and a watermark. Both the Header and Footer options allow you to configure the Text, Font Size and Color, as well as the Alignment. For the Watermark option, showcased in the screenshot on the right, you can also choose between fixed or automatic font sizing and between horizontal or diagonal placement. You cannot, however, insert a company-branded image in the header or footer, control the font family and so on. In all fairness, there’s more you can do with the markings than described here, such as using a variable to automatically populate Owner of the document, so make sure to review the documentation.
The last set of options you can configure for a label are conditions to automatically apply it to matching documents. To start with the process, press the Add a new condition link. You will then have to choose between using one of the Built-in conditions or create a Custom one. For the former, the process is similar to configuring DLP policies for Exchange Online – you select from a list of predefined filters such as Credit Card Number or IBAN, configure the minimum number of occurrences and define whether to count duplicate matches or not via the "Count occurrences with unique values only" toggle.
If you decide to create a Custom condition, you will first have to Name it (the built-in ones are named based on the filter selected). Next, you need to specify the exact phrase to match, whether to match it as a regular expression and whether you need a match with case sensitivity taken into consideration. Lastly, configure the minimum number of occurrences and whether to Count occurrences with unique values only (the option is only available when using regex match).
Apart from configuring the conditions you need to Select how this label is applied: automatically or recommended to user. Automatic classification works by stamping the classification label upon saving the document by automatically applying the label along with any marking or protect actions. On the other hand, recommended classification works by presenting the user with a Policy tip, advising him to select a particular label instead of automatically applying the classification. In both cases, you can specify the text of the policy tip under the "Add policy tip describing to users the reason for applying this label" box.
The screenshot below shows an example of a label configured with one custom and one built-in condition: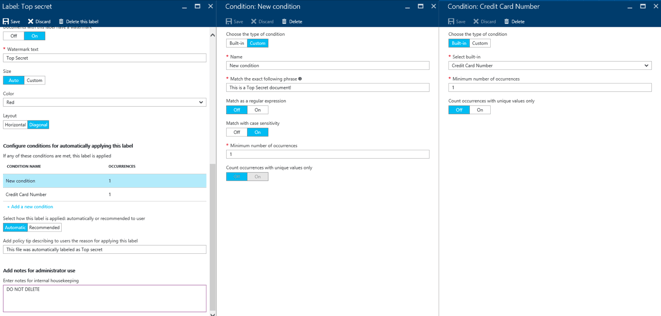
Lastly, you can also add some notes that will only be visible to administrators under the "Enter notes for internal housekeeping" field.
Making changes to the classification policy should be followed by the Publish action and the AIP UI will indicate this by a bright orange notification. On the client side, the policies are saved as human-readable files under the %localappdata%\microsoft\msip directory, along with the client logs and telemetry. The policy is refreshed every time an Office application is launched (unless another instance of the same app is already running), and on a regular 24 hour schedule.
We’ve already shown how the end user can view or set the classification policy via the AIP Office add-in, but let’s expand a bit more on the experience. The policy title and tooltip, as well as the set of 5 labels along with their corresponding color and tooltip are surfaced in the Information Protection bar. Once a label has been set on the document, the bar will be updated with the label name and color, and the label selector control will be hidden. At this point, if you want to change the label, you can press the newly appeared Edit button. Doing so will bring back the label selector along with a new button to Remove the current label.
Upon saving the document, the rest of the policy settings come in play. If mandatory labeling is configured, the user will be prompted to select a label. If any labels with automatic conditions are present in the policy, the document will be scanned, and upon finding a match, the label will be set and any actions configured will be applied. For example, the label we created above will detect a single instance of CC number in the document and apply the watermark: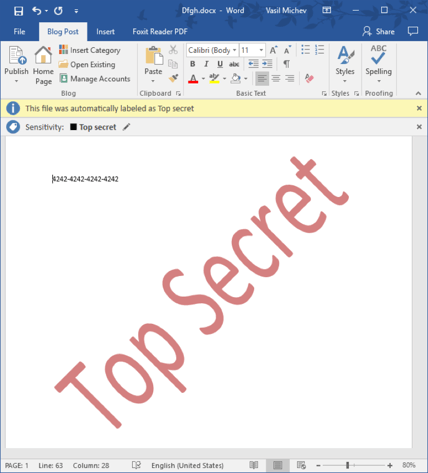
If for any reason an incorrect label has been applied, you can change it, respecting the justifications settings configured in the Azure portal. After manually changing the label, automatic classification will not be applied anymore, even if you add additional text matches (or even a different condition).
Before closing off this section, lets also mention a few issues in the current implementation. As noted already, the AIP client is currently delivered as an Office add-in and cannot be used to classify files outside of the Office apps (for example by right-clicking on a document in File Explorer). This functionality is coming soon, and we can also expect AIP merging with the RMS sharing app. Clients for mobile devices are not yet available but should be coming soon as well.
On the administrative side of things, a major limitation is the lack of support for form-based authentication. This in turn means that if you are using AD FS, Windows Integrated Authentication must be configured and used instead. While this is great for domain-joined machines, it will be a problem for any “external” clients, including mobile devices. Another issue is controlling access to AIP. The classification policy applies to all users, and unlike RMS, we don’t have “departmental” templates. Instead, controlling access is possible by limiting access to the client. Integration with ExO, SPO and the rest of Office 365 services is missing, but coming soon, as are improvements to automatic classification.
In this article, we did an overview of Azure Information Protection, which brings data classification and labeling functionality and combines it with the benefits of Azure RMS. The result is a comprehensive solution that covers all the stages of the document lifecycle, while at the same time offering simple and intuitive controls.
The currently available version of AIP does have some limitations, but the team is aware of those, and before long, we will have a powerful suite of tools, integrated with the rest of Office 365. To check the future of AIP as well as to get a more detailed look at the different bits and pieces, you can watch the following sessions from Ignite: BRK2127, BRK2128 and BRK3095.

Vasil has been actively involved with Office 365 for over four years now. He spent over an year as Support Engineer for Microsoft Online Services with one of Microsoft's vendors, working with BPOS and Office 365 customers. Switching sides, he later held support positions with several multinational enterprises, before finally moving to a consultant role. This varied experience allows him to have an unique perspective on the ins and outs of the Office 365 suite. He has closely followed the evolution of Microsoft's cloud offerings, starting with BPOS, with expertise covering all stages of the Office 365 lifecycle. He holds a charter member certification for Office 365 (MCITP and MCSA), and has been awarded as Microsoft MVP for second year in a row.


Azure Rights Management Service (RMS) is an information protection solution, the cloud-based...


Active Directory Rights Management Services (AD RMS) is an on-premises information rights...