Preservation Policies in Office 365
Preservation policies were introduced almost a year ago as part of the Compliance Center in Office...


About a year ago, we published an article on how to manage preservation policies in the new Security and Compliance Center in Office 365 via PowerShell. Over the course of the last year, a great number of new features have been added to the SCC, which is now the central place for data governance in Office 365. With some minor exceptions, all of the functionalities exposed in the SCC are very sensitive and controlling access to them is vital. In this article, we will cover some methods to restrict access to the SCC features. By using PowerShell, of course!
As a reminder, to connect PowerShell to the Security and Compliance center, one needs to follow the steps detailed in this article. Most of the Get- cmdlets can also be used if you connect to Exchange Online PowerShell. To avoid the overlap between the two sets of cmdlets, I prefer to configure my SCC PowerShell session with a different suffix, namely the “C” character. In all the examples below you should remove the “C” prefix to get the actual cmdlet name.
The Security and Compliance Center shares its roots with the Exchange Admin Center, which is immediately evident from the method we use to connect to SCC PowerShell, the overlap between cmdlets and most importantly, the Role-based model used to govern access. As with the EAC, permissions can be granted by editing the membership of one of the default Role Groups found under the Permissions node in the SCC, or by creating a new Role Group. There’s no fun in doing things via the UI though, so let’s take a look at the corresponding PowerShell cmdlets.
Not all of the familiar ExO RBAC cmdlets are available in the SCC. In fact, all the RoleEntry and RoleAssignment cmdlets are missing as evident from the below screenshot:

The same is true for all the ManagementScope-related cmdlets. In turn, this means that we cannot get as granular with the SCC roles as we can with the ExO ones. For the cmdlets we do have access to, the names match exactly the cmdlets available in ExO, so using a prefix is handy!
A total of 13 Role Groups are available in the SCC by default, “admin role” groups included. Much like with the ExO RBAC model, membership of these “admin” groups is populated by accounts assigned admin roles in the Office 365 admin center and cannot be managed directly. The full list of Role Groups can be obtained via the Get-CRoleGroup cmdlet and is shown below:

If the default Role Groups do not meet your needs, you can create new ones via the New-CRoleGroup cmdlet. At the time of writing this article, the cmdlet did not behave as expected though, so we will ignore it for now.
You cannot edit or remove the default Role Groups, the only action you can perform with them is modify the membership. To assign a user or group to specific Role Group, we can use the Add-CRoleGroupMember cmdlet, for example:
Add-CRoleGroupMember -Identity eDiscoveryManager -Member Pesho
The rest of the Role Group cmdlets can be used to list, remove, or update the Role Group membership (Get-/Remove-/Set-CRoleGroupMember respectively).
Those of you that have worked with the Permissions section in the SCC are probably aware that the eDiscovery Manager Role Group includes two types of members. Users assigned under the eDiscovery Manager group will have access to eDiscovery cases they have explicitly be assigned to, and this is the group whose membership populated via the example we used above. Apart from this, we also have the eDiscovery Administrator group, members of which get access to all eDiscovery cases in the organization. Access to this group is granted via the Add-CeDiscoveryCaseAdmin cmdlet:
Add-CeDiscoveryCaseAdmin -User Pesho
You can use the Get-/Remove-/Update-CeDiscoveryCaseAdmin cmdlets to list, remove, and update the membership of the eDiscovery Administrators group.
eDiscovery is one of the most sensitive features and while we can control access to it via the corresponding Role Group, some organizations need to have more granular controls in place. For example, a common scenario is to limit eDiscovery features per country/location. By default, every person that’s assigned the eDiscovery Manager role will be able to search and export data from every mailbox, SharePoint, and OneDrive for Business site and every other workload supported for eDiscovery, which raises some concerns.
In Exchange, we can limit eDiscovery via custom management scopes. The only supported method for this is based on membership of a Distribution Group, however using some other criteria can also work. As eDiscovery in the Security and Compliance Center covers other workloads too, a new method that applies to Content/eDiscovery searches was needed. The new feature is called Search permissions filtering and allows you to not only control the objects a user can search, but even content inside a mailbox or site. Not only that, but you can also control the actions exposed to the user, for example you can disable users from Purging results returned from the search on a specific mailbox, while at the same time keeping the Purge functionality active for the remaining objects.
The Search permissions filtering feature is managed via PowerShell and the corresponding cmdlets are New/Get/Set/Remove-ComplianceSecurityFilter. In order to use those cmdlets, you must be a member of the Organization Management Role Group (the one in the SCC). More specifically, you need to have the “Role Management” role assigned.
Search permissions filters work by “attaching” themselves to each Content/eDiscovery search performed. In other words, the criteria configured for the filter is added (logical AND) to the query used in the actual search and results are trimmed accordingly. For example, if we have a search permissions filter that limits the user to only search mailboxes in the IT department, only results from these mailboxes will be returned even if the user specified all mailboxes in the organization as the search query. If multiple search filters exist, each of them will be evaluated (logical OR configuration, or “any of”) and the end result will be the combined set of results of the each Search query and the Search permissions filters.
As no search filters are configured by default, to get started we can create one via the New-ComplianceSecurityFilter cmdlet. A proper FilterName and Description must be provided, as well as the list of Users on which the filter will act upon. You can provide multiple users by separating them with commas, but you cannot use Distribution Groups. The only acceptable group type is a Role Group you have created in the SCC. Next, you will need to provide the Filter. Filters consist of Prefix, identifying the type (Mailbox, MailboxContent, Site, SiteContent) and a suffix that specifies the property used. Lastly, the Action parameter lets us control the type of actions the user can perform (Search, Preview, Purge, Export or All). For more details on the filter syntax, refer to the help articles above.
The following example will create a new search permissions filter to limit the user to only search mailboxes of the Shared mailbox type, without imposing any restrictions on the Actions he can perform on them:

Yes, the filter uses my account as an example, and yes, it will apply regardless of the fact that it has every possible permission in the tenant. For example, if I now create a Content search that includes my own mailbox, no results will be returned as the search permissions filter limits me to only shared mailboxes. What’s even better is that it will apply to existing searches too! Even if I have run a Content search previously and got results, the newly created filter will now be AND-ed to the query and results will be trimmed accordingly for any subsequent action.

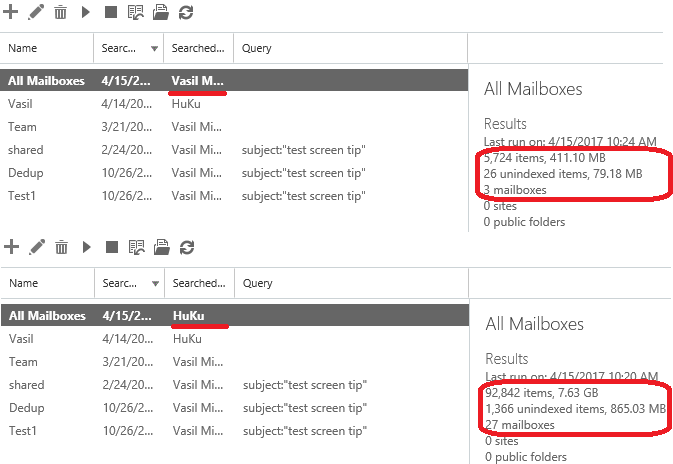
Since the filter only applies to me, if another user runs the same Content search the filter will not be active and results will be returned as expected, as seen on the right-hand side part of the above screenshot. We can also use another Content search example to illustrate the effect of the filter. On the screenshots below, the results of running the same search, one that includes all content from all mailboxes, are depicted, run by me and another user:

As my user is restricted to only run searches against Shared mailboxes, the results are extracted from just the three mailboxes of this type available in my tenant. Other users are not subject to this restriction, they are able to search all mailbox types, thus the number of results is far greater.
Because of the logical AND configuration used when a filter is applied to a search query, you cannot go “outside of the scope” of the individual filter. In other words, the set of results returned will be equal or less than what the search filter allows. Multiple filters are applied in an OR configuration though, which has different behavior.
Let’s examine a scenario where more than one filter is applied. For example, we want to still limit the user to only use the eDiscovery functionality against Shared mailboxes, but we also want to make one sure he can also search one particular user mailbox. At the same time, we can block all other actions he can perform on said mailbox. To do so, we create another filter and the resulting set is depicted below:

Each of the filters will be joined (logical AND) with the search query and then combined in a logical OR configuration. If we use the same Content search as in the previous example, namely search all content in all mailboxes, this means we end up with two sets of results:
Those sets are then combined as a result of the logical OR operator, thus we get an increased number of results compared to the example in the previous section:

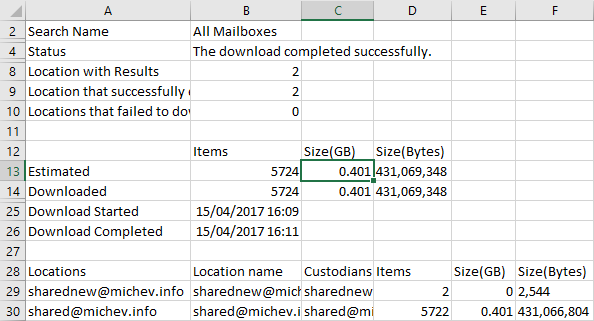
However, the newly created filter only applies to the Search operation. Thus, if I am now to run the same Content search with the Export operation, the “huku” mailbox will no longer be included, and only results from Shared mailboxes will be exported. The report file generated from the Export operation reflects on this:

Even with such simplistic examples the power of the search permissions filters feature is evident. It allows you to granularly control one of the most sensitive functionalities in the service, down to the individual message/document, along with the actions that can be performed on items. Even support for Inactive mailboxes is included.
Not everyone likes PowerShell, and some might find this feature hard to use as there is currently no UI that exposes it. Another point worth mentioning is that using filters might result in some confusion, as it is not immediately evident whether a filter acted. Including some indication about this in the UI is something Microsoft should look at. Another possible improvement is to allow us to enable/disable filters, as currently, a filter is effective immediately after creation and the only way to stop it from applying is to delete it.
In this article, we did a short overview of the different methods available to restrict access to some of the SCC functionalities. Role Group based access works very similar to what we have in the EAC, while the search permission filters allow for granular control of the eDiscovery feature. Combined, those two offer a significant improvement compared to the controls we have available for the individual workloads. And, together with the recently introduced coverage for eDiscovery activities in the Audit logs, we now have a comprehensive AAA solution.

Vasil has been actively involved with Office 365 for over four years now. He spent over an year as Support Engineer for Microsoft Online Services with one of Microsoft's vendors, working with BPOS and Office 365 customers. Switching sides, he later held support positions with several multinational enterprises, before finally moving to a consultant role. This varied experience allows him to have an unique perspective on the ins and outs of the Office 365 suite. He has closely followed the evolution of Microsoft's cloud offerings, starting with BPOS, with expertise covering all stages of the Office 365 lifecycle. He holds a charter member certification for Office 365 (MCITP and MCSA), and has been awarded as Microsoft MVP for second year in a row.


Preservation policies were introduced almost a year ago as part of the Compliance Center in Office...


Spoofing has long been one of the biggest issues with email, and with the move to cloud services in...