Multi-factor authentication has been available, at least for users with administrator roles assigned, in Office 365 since June 2013. The problem is that there is a confusing warren of options and configurations that greatly affect the MFA experience an Office 365 user will, or will not, see. In this blog post, I will explain what configurations you need and what MFA experience you will get based on those configurations.
The Problem With Office 365 MFA
I find when my customers think about MFA, they are thinking about the experience they have on a VPN, or maybe the experience when using MFA to sign into their workstations in the morning. They are thinking of protecting a “single sign-on” experience with two factor authentication.
When Office 365 MFA originally launched, it was barely MFA at all. Office 365 is not one application, but rather a collection of applications. Each application authenticates users in different ways. Since different applications use different authentication methods, Multi-Factor Authentication can work differently for different applications.
Turning on MFA
Turning on Multi-Factor Authentication in your Office 365 tenant is not as straightforward as you’d think. Or to be more specific, turning on MFA alone will not give you MFA for most of your Office 365 applications. You also need to turn on Modern Authentication to get a true MFA experience, but more on that in a bit.
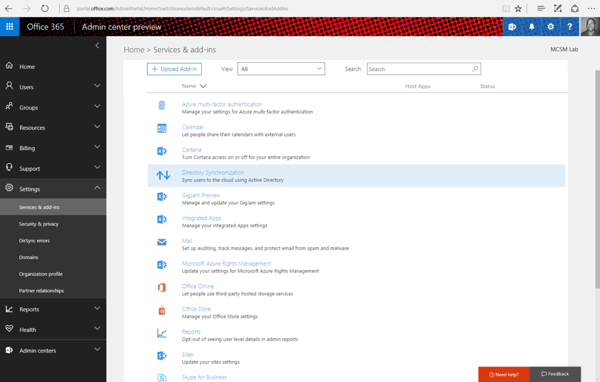
To turn on MFA, go to the Office 365 Admin portal and navigate to Azure Multi-factor authentication as shown in the screenshot below:

Select the MFA option from the top of the listed settings, and click though to the MFA configuration GUI.
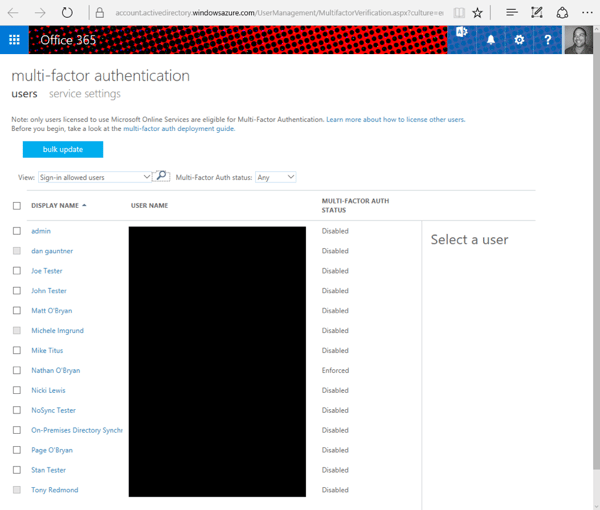
You’ll get to a page that lists all the accounts in your tenant and each account's MFA status (user names blacked out below to protect the email addresses of the not-so-innocent).

If you look closely, you’ll see MFA is set to ‘Disabled’ for all users except me. You can turn on MFA for selected users without having to turn it on for everyone. I absolutely recommend this. You don’t want to deal with the help desk calls you’re going to get if you turn on MFA for all your users at once.
Before you turn on MFA for any users, let’s look at the services setting at the top. The service settings page allows you to set universal settings for all users in your tenant.
The three settings here are:
- App passwords – Here you can allow users to create their own app passwords. All app passwords are automatically generated, so users never get to choose their app passwords. Selecting “allow” gives users the ability to manage their own generated app passwords, not enter the passwords they want to use.
- Verification options – Here you can allow users to select from four different verification options. It’s important to note that the two options I have selected above are the only completely “out of band” authentication methods. “Text message to phone” and “Verification code from mobile app” both require the end-user to type in a number they receive on their phone into the computer on which they are authenticating. The other two options give you a second authentication factors that happens completely on the phone, so I prefer those.
- Remember multi-factor authentication – Here you can set the time period that users do not need to re-do their MFA on devices they trust. This can be used to keep down the number of times users have to authenticate.
Once you are comfortable with these settings, we need to digress a little bit and talk about Modern Authentication.
Modern Authentication
Modern Authentication is a new authentication protocol Microsoft is using across Office 365 applications that allows for MFA to work (as well as other authentication features). Without Modern Authentication, MFA falls back to using app passwords, which is not MFA at all.
Modern Authentication is automatically turned on for SharePoint Online, but you have to manually turn on Modern Authentication for Exchange Online and Skype for Business Online. Modern Authentication will eventually be enabled by default for Exchange Online and Skype for Business Online, but as of this writing you have to manually enable MA for these services. I’ll include the instructions below.
As May 2016, Modern Authentication has moved to general availability for all Office 365 tenants. However, MA is not completely available for all clients. The below chart from TechNet shows where MA is available and where it is not yet.
Enable Modern Authentication for Exchange OnlineIf the client you are using does not support Modern Authentication, then you will probably have to use the app password to authenticate on that client once you enable MFA.
- Connect to Exchange Online using remote PowerShell
- Run the following command: Set-OrganizationConfig -OAuth2ClientProfileEnabled:$true
- Verify that the change was successful by running the following: Get-OrganizationConfig | ft name, *OAuth*
Enable Modern Authentication for Skype for Business Online
- Connect to Skype for Business Online using remote PowerShell: Set up your computer for Windows PowerShell
- Run the following command: Set-CsOAuthConfiguration -ClientAdalAuthOverride Allowed
- Verify that the change was successful by running the following: Get-CsOAuthConfiguration
Back to Enabling MFA
Once you have Modern Authentication turned on for all Office 365 applications, you can enable MFA for your first user. Select the check box to the left of the user you want to enable MFA for, then select “enable” on the right.
Once a user is enabled for MFA, that user needs to set up his or her individual MFA settings in the Office 365 portal. These settings can be configured at https://portal.office.com/account/#settings
From that page, select Security & Privacy on the left, and then Additional security verification in the middle pane.
That will take you to the below pictured screen where each user can configure his or her own MFA settings (within the limits that you set in the admin portal above).
On this page users can select their preferred MFA option and set the phone number they want to use (I blacked mine out here). Users can also go to the app password tab to set their own app password (if you allowed this option above) or recreate a new app password.
Users do have the option to create separate app passwords for each app, but I cannot imagine many users will be successful logging in under those circumstances.
The Azure Authenticator App can be set up easily with the configure button shown above. That button will display a QR code that is used in the authenticator app to pair that device with your Office 365 account.
Which Applications Do I Need to Use the App Password For?
This is the real sticky wicket of Office 365 MFA. There is no single Microsoft resource that lists the Office 365 applications for which you will need to use an app password. I could create a list here, but it may well be outdated by the time you read this post. What I’m going to do is try to give you some general guidelines as to which applications you’ll need to use the app password for.
- PowerShell – Most remote PowerShell sessions to manage Office 365 applications will require you to use your app password. The single exception to this is PowerShell for Azure AD, which does use real MFA. Azure AD using real MFA proves it’s possible to secure PowerShell sessions with MFA, so hopefully this will be available for Exchange, Skype for Business, and SharePoint remote PowerShell sessions in the near future.
- Legacy Outlook – The current versions of Outlook for both PC and MAC use Modern Authentication, so MFA works. Legacy versions of Outlook do not use Modern Authentication, so MFA does not work. The exception to this is Outlook 2013, which can be configured to use MA. Configuring Outlook 2013 to use MA is not a trivial task. [More info on Office 2013 modern authentication configuration]
- ActiveSync clients – The built-in ActiveSync applications on iPhone and Android phones will need to use the app password. This is not the case for the Outlook app available on both platforms.
Wrapping Up
Multi-factor Authentication for Office 365 is still not a completely finished product at this point. There are situations where MFA still does not work, and you will be forced to use an app password, which is clearly not MFA.
While Office 365’s MFA implementation is fairly easy to implement, it would be nice if there were more granular per-application controls available so that MFA could be required only for applications that actually support MFA. Other than that complaint, Office 365’s MFA implementation is a nice add-on for your Office 365 service that can help provide improved security for your tenant. I recommend you try it out, and if you find your users can function within the current limitations, turn it on for added security.