A Closer Look at Azure AD Connect – Part 4
Welcome to the fourth part of this article series about Azure AD Connect. In the previous article,...


In Exchange 2010 users can create distribution lists that are visible to the whole organization through Outlook Web App in the user Options. By default these are created in the Users OU in Active Directory.
Considerations
It is likely that if your users have figured out how to use this feature they may not understand that they are creating groups that everyone can see. If they do understand that everyone can see their newly created list, it is likely its naming convention doesn’t satisfy your corporate naming standards. So what are your administrative options for remediating this issue?
Remediation Options
Option 1:
First take some time to review the following TechNet article. http://technet.microsoft.com/en-us/library/ee332316(v=exchg.141).aspx This article discusses and demonstrates what it takes to “Turn Off User’s Ability to Create Distribution Groups” in Exchange 2010, because not all organizations want their users creating distribution lists. According to this article you have two choices on how to approach this.
Option 2:
This option uses a PowerShell script to check the users OU in Active Directory and email notifies the appropriate administrator(s) to review the distribution list. By email notifying the administrator through a scheduled task about newly created distribution lists it empowers the administrator by double-checking what the users are creating, but also empowers the user by allowing them to create their own lists.
This option does not involve modifying your Default Role Assignment policy or creating an additional role assignment policy. It assumes that you do not store your production distribution lists in your Users OU in Active Directory. It also assumes that if you do keep your distribution lists in the Users OU that you will move them to a new container before implementing. To implement use the following steps.
Create the .ps1 PowerShell script:
1. Copy the following data into notepad and then save as a .ps1 file.
$emailserver = "exchange.domain.com"
$msgfrom = "dist@domain.com"
$msgTo = "user@domain.com,user2@domain.com"
$msgsubject = "Distribution Lists in the Users OU"
$message = New-Object System.Net.Mail.MailMessage $msgfrom, $msgto
$message.subject = $msgsubject
$message.IsBodyHTML = $true
$message.Body = Get-DistributionGroup -OrganizationalUnit "CN=Users,DC=domain,DC=com" | select-object name,displayname | ConvertTo-Html
$smtp = New-Object Net.Mail.SmtpClient($emailserver)
$smtp.Send($msg)
2. Modify the following variables and settings as they apply to your environment $emailserver, $msgfrom, $msgto, $msgsubject and the OrganizationalUnit information.
3. Re-save the File.
Create a scheduled task to execute the newly created .ps1 PowerShell script:

1. Request or create a service account to run the scheduled task. This account will need administrator access to Exchange and should not be used for anything else.
2. Sign into a server that has the Exchange Management Tools and Exchange Management Shell installed.
3. Open Task Scheduler through the server Control Panel.
4. In the Task Scheduler console expand the tree on the left hand side until you see Microsoft. From there, right-click on Microsoft and choose “Create Task.

5. Give your scheduled task a name and then check the radio button marked to “Run whether user is logged on or not”.
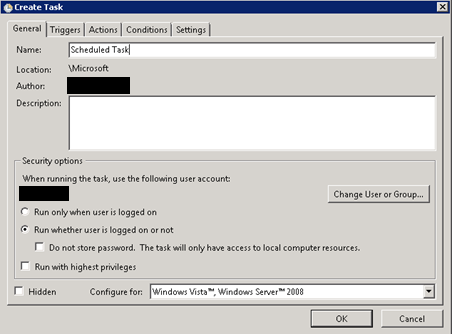
6. On the Triggers Tab, in the bottom left corner click the “New” button and create an appropriate schedule for your task.
Note: This frequency should be determined by how often you want to check for newly created distribution lists.
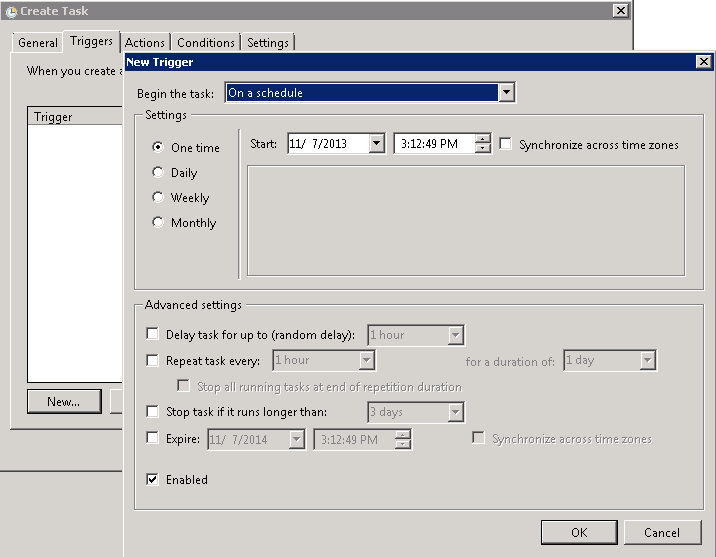
>7. Click on the Actions Tab and then in the bottom left hand corner click the “New” button.
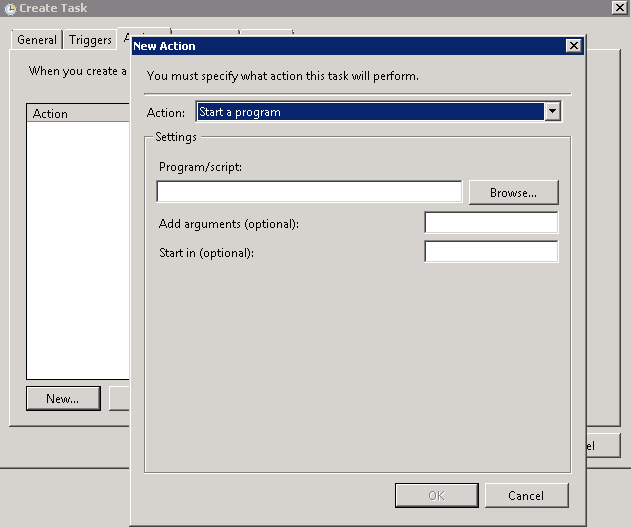
8. Fill in the Program/Script and Add Arguments Fields. See below for the syntax for each field and adjust accordingly for your environment.
Program/Scripts: C:\Windows\System32\WindowsPowerShell\v1.0\powershell.exe
Add Arguments: -command ". 'C:\Program Files\Microsoft\Exchange Server\V14\bin\RemoteExchange.ps1'; Connect-ExchangeServer -auto; 'c:\FilePathtoPS1\filename.ps1'
9. Skip the conditions Tab.>
10. Click on the settings tab and adjust to your preferences; however, please note that the default settings are typically ok.
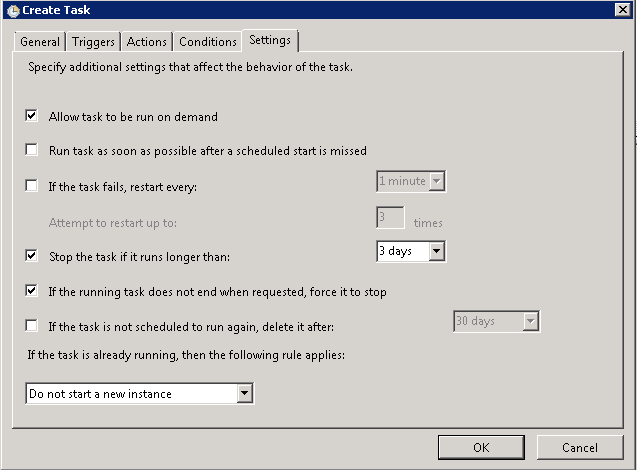
11. Click Ok.
12. You will be prompted to enter the password for the account used for the scheduled task.
Upon completion of this series of steps the appropriate people will be email notified if there are distribution lists in the Users OU in Active Directory.
Summary
Regardless of the method you choose for managing your user created distribution lists, this article should help you make the right decision for your organization.

Theresa is a Sr. Technical Systems Administrator and has been working as a technical expert in IT for over 18 years. Theresa has her MCSE, CCA and EPIC ECSM certifications. Her areas of expertise are in the areas of Exchange, Active Directory, Lync, SharePoint and Citrix XenApp. She has architected, designed, implemented and led complex projects in all of these areas. She also is a public speaker, speaking at events such as Briforum 2013 and upcoming will be at E2E Virtulization conference in May 2014.



Consider the following scenario: you are about to implement directory synchronization for Office...