A Closer Look at Azure AD Connect – Part 2
In the previous part of this article series, we've taken a first look at Azure AD Connect and...

Microsoft released Azure AD Connect to the public on June 24. The long-anticipated tool is the successor to Azure AD Sync and DirSync. But it’s much more than that.
Although a large part of Azure AD Connect still revolves around directory synchronization, I like to look at it more as a "Cloud Identity Enablement" — a solution rather than just a synchronization component. This is because Azure AD Connect not only allows you to deploy directory synchronization for almost every possible identity scenario you can dream of, but it also enables you to set up and configure identity federation through Active Directory Federation Services from within the same wizard.
Configuring identity federation for your Office 365 tenant consists of three key steps:
1. Register the domain you want to federate in your Office 365 tenant. Although other options are available, this domain should match the domain name suffix of the User Principal Name of your on-premises user accounts. For instance, if your UPN is michael@mycompany.com, the domain you register in Office 365 would be "mycompany.com."
Note: It is recommended to ensure that the UPN matches the user's email address to avoid any confusion on the user's end. I often get into arguments about why this is important. Instead of trying to explain, let me show you with an example. Consider the following case. I'll use my own name as an example because it's rather lengthy, and it makes a good case:
Let's say my UPN is mvanhorenbeeck@mydomain.com, the same account name + domain name is MYDOMAIN\mvanhorenbeeck, and my email address is michael.van.horenbeeck@domain.com. To complicate things even more, you could add a different SIP address, too. For instance, mvanhorenbeeck@sipdomain.com. But that would lead us too far for this article…
For many (experienced) administrators, the difference between each is very clear. You know when and where to use which version of my username. However, for a regular user (no disrespect intended), most of the usernames look like an email address. There's a saying that goes, "If it looks like a duck and it quacks like a duck…"
Well, in this case, the UPN looks like an email address, but it isn't. So when the user then has to authenticate in Office 365, he might erroneously enter the email address, which could then cause the authentication to fail. Without going into too much detail, I believe you get the picture. Needless to say, if my UPN, email address, and IM address are all the same, there is no confusion possible.
2. Deploy AD FS servers and — if you want to do it 'right' — add one or more AD FS Proxy or Web Application Proxy servers. Typically, this would be Windows-based servers, but some organizations choose to deploy alternative solutions like Celestix AD FS appliances, OKTA, Ping Identity or the built-in AD FS capabilities of Citrix Netscaler or F5 Big IP load balancers. Regardless of which solution you choose, there is some degree of work involved. Deploying AD FS on Windows Server 2012 R2 is pretty straightforward:
Similarly, configuring an AD FS Proxy server or Web Application Proxy server is merely running through a wizard — multiple times.
3. Once you have done all this, you must convert your domain in Office 365 to a federated domain. This is typically done by connecting to Azure AD from one of the AD FS servers and executing the Convert-MsolDomainToFederated cmdlet.
Now, imagine you could do all of this without having to log on to any of the servers and just enter the relevant information in the wizard. Wouldn't that be a time-saver? I certainly would hope so! For anyone who is not familiar with the process to enable federation, the wizard not only saves time, it also saves you from having to figure out the correct order of things as well as how to deal with it.
As a consultant, you might argue that knowing exactly what is happening in the back is the key to making a difference, yet I wouldn't be too surprised to learn that the majority of customers are just trying to get things configured as quickly and as easily as possible!
Phew, this was a rather long way just to tell you that the Azure AD Connect tool can be really helpful for configuring authentication through AD FS, too!
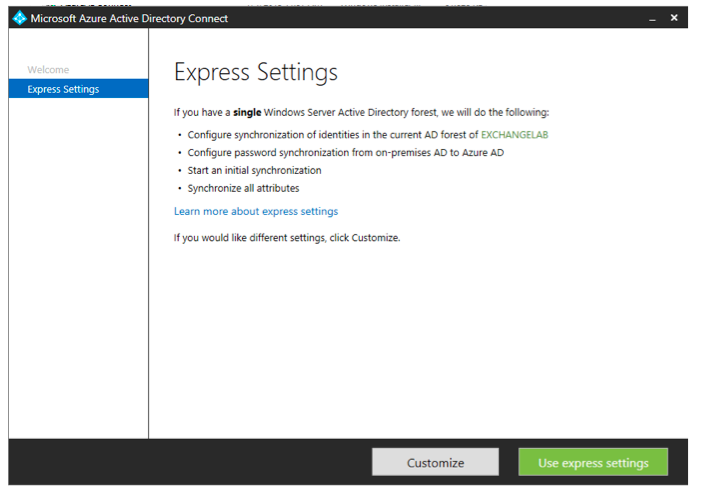
Let's take a closer look at what happens if you install the tool. In this part of the article, we'll focus on the Express Settings. This is the default option and means that Azure AD Connect will set up Directory Synchronization with its default settings while also enabling Password Hash Synchronization. This option is comparable to a default installation of DirSync of Azure AD Sync, with the exception that Password Sync is now enabled by default.

Like before, the wizard will guide you through a few steps during which you have to enter your Office 365 tenant admin credentials as well as your on-premises Enterprise Admin credentials. At the very end of the wizard, you will have the option to select Exchange Hybrid deployment, which will configure the required attribute write-back options.
If you have selected the Express Settings option, Azure AD Connect will create a new "LocalDB" instance. LocalDB is not the same as a SQL Express instance or the Windows Internal Database. LocalDB is a "lightweight" version of SQL Express. It offers the same functionality but does not have the same prerequisite requirements, etc. As a result, the installation of the sync component(s) is much faster than before. The LocalDB instance can grow up to 10GB in size, just like SQL Express. This means that for larger environments, you will have to deploy a separate SQL database. But we'll cover that option more in detail in the next part of this article.
The LocalDB database files are stored under: C:\Program Files\Microsoft Azure AD Sync\Data.
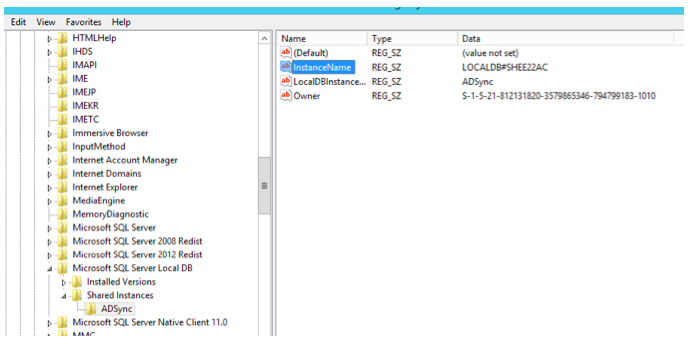
For those interested in the database internals, you can use SQL tools to get access to the LocalDB. The information you need to connect to the database is stored in the computer's registry under the following location:
HKLM:\SOFTWARE\Microsoft\Microsoft SQL Server Local DB\Shared Instances\ADSync
In there, look for a key named "InstanceName":

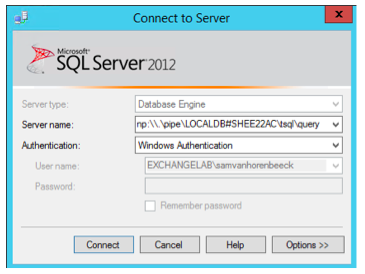
Then, you can use that information to connect to the LocalDB using a named pipe connection in SQL Management Studio:

The question now is: Why would you care? I don't disagree. Usually there is no reason for you to snoop around in the database. However, sometimes you want to leverage that information for reporting purposes. So does a PowerShell script created by Mike Crowley (and me) that uses SQL to generate an HTML report for AAD Sync. If you are interested in the script, have a look here:
Anyway, back to the tool itself… After the wizard completes the initial configuration, it will immediately perform a full synchronization unless you have selected otherwise. You can follow up on the progress using the Synchronization Service Manager. The tool is part of the synchronization engine and can usually be found under:
C:\Program Files\Microsoft Azure AD Sync\UIShell\miisclient.exe.
Once opened, navigate to the operations tab, which displays the "run history." This is an overview of the last synchronization attempts, broken out by task within each synchronization:

In subsequent parts of this series, we'll dive more into the Synchronization Service Manager and what it can be used for. If you have been working with the tool in Azure AD Sync, you'll see it's very similar. That is because underlying Azure AD Connect is building further on top of Azure AD Sync, or, better said, the same synchronization engine (which is based on FIM).

Michael Van Horenbeeck is a Microsoft Certified Solutions Master (MCSM) and Exchange Server MVP from Belgium, with a strong focus on Microsoft Exchange, Office 365, Active Directory, and a bit of Lync. Michael has been active in the industry for about 12 years and developed a love for Exchange back in 2000. He is a frequent blogger and a member of the Belgian Unified Communications User Group Pro-Exchange. Besides writing about technology, Michael is a regular contributor to The UC Architects podcast and speaker at various conferences around the world.

In the previous part of this article series, we've taken a first look at Azure AD Connect and...

Yesterday, Microsoft announced the General Availability (GA) of Azure AD Connect. Azure AD Connect...